After opening Laserfiche Scanning from the Laserfiche Windows client or the Laserfiche web client, consider each of the following steps before scanning:
- Selecting and Configuring a Scanning Source
- Adding a Custom Sample Image
- Configuring OCR
- Configuring Default Properties
- Configuring Image Enhancements and Processes
Selecting and Configuring a Scanning Source
- Select Choose Scan Source under File in the menu bar.
Note: If you have not previously defined a scanning source, you will be automatically prompted to do so when you open Laserfiche Scanning.
- In the Scan Sources dialog box, choose a scanning source. Learn about configuring scan sources.
Note: Only sources you have purchased and/or installed will be available to choose from.
Adding a Custom Sample Image
A custom sample image enables you to test image enhancements before scanning. For best results, sample images should be as similar as possible to the pages you want to scan.
To add a sample image
- Select the Image Processing node in the Scanning Explorer Pane.
- Select Import or Scan Sample Image at the bottom of the Document Properties Pane.
To test an image enhancement
- Add and configure an image enhancement.
- Select Test Process at the bottom of the Document Properties Pane. Note any changes to the sample image in the Display Pane.
Configuring OCR
To generate text from scanned documents, select OCR Settings from the toolbar. This image process converts text in a scanned image into text that can be edited on a computer. This process is called optical character recognition (OCR). OCR works best on clearly typed documents. Extracted text is sent with the image to a Laserfiche repository. It will be available for text searches. In the ![]() OCR Settings dialog box, configure the following:
OCR Settings dialog box, configure the following:
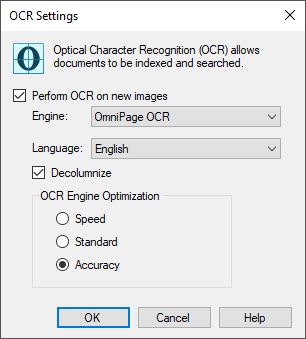
- To enable OCR, select Perform OCR on new images.
- Select a language to determine which type of characters will be preferred.
- Select Decolumnize to remove column formatting from scanned images. If this option is disabled, columns will determine the vertical order in which text appears in a scanned document's text file.
- In the Optimization Priority option, select Speed, Standard or Accuracy.
Note: OCR is a resource-intensive process which can be dramatically affected by poor quality images, improperly scanned images, and/or a machine's processing power and RAM.
Note: The OCR engine used by Laserfiche Scanning is OmniPage OCR. It is automatically installed with Laserfiche Scanning.
Configuring Default Properties
Defining default properties before scanning applies the following values and settings to all documents in the current scanning session that have yet to be scanned.
- Default name
- Field values
- Tags
- Volume
- Destination
- A preference for how pages should be grouped into separate documents
Tip: Default properties can be modified for each document after scanning.
Note: Document name, template, and volume values are automatically inherited from the Options dialog box.
To configure default properties
- Select the Default properties node in the Scanning Explorer Pane.
- In the Document Properties Pane, assign a default document name. Click
 the right arrow button to use tokens.
Note: Use tokens to ensure each scanned document has a unique name. Documents without unique names will be renamed once they are stored.
- Select the
 Fields tab. Assign a template and/or field values. Click the right arrow button to use tokens.
Tip: Click Clear Fields at the bottom the Document Properties Pane to remove all field values.
- Select the Tags tab. Assign and/or remove tags and tag comments.
- Select the Settings tab.
- Under Document Length, specify if and how often pages should be grouped into separate documents (based on the number of pages scanned).
Example: Assume you limit pages per document to three. Scanning 12 pages will result in four separate documents, each with a page count of three.
Note: Scanner malfunctions do not reset the Document Length setting's page count.
- Under Folder Path, specify where scanned documents will be stored. Click Browse to select a repository location or manually enter a destination path. Click the right arrow button to use tokens.
- Specify a volume for the documents to be stored in.
- If your repository supports digital signatures and you want to automatically sign scanned documents, select Auto-sign documents. The document signing dialog will open to allow you to configure your signature.


